LiveCreative: Eye Pillows

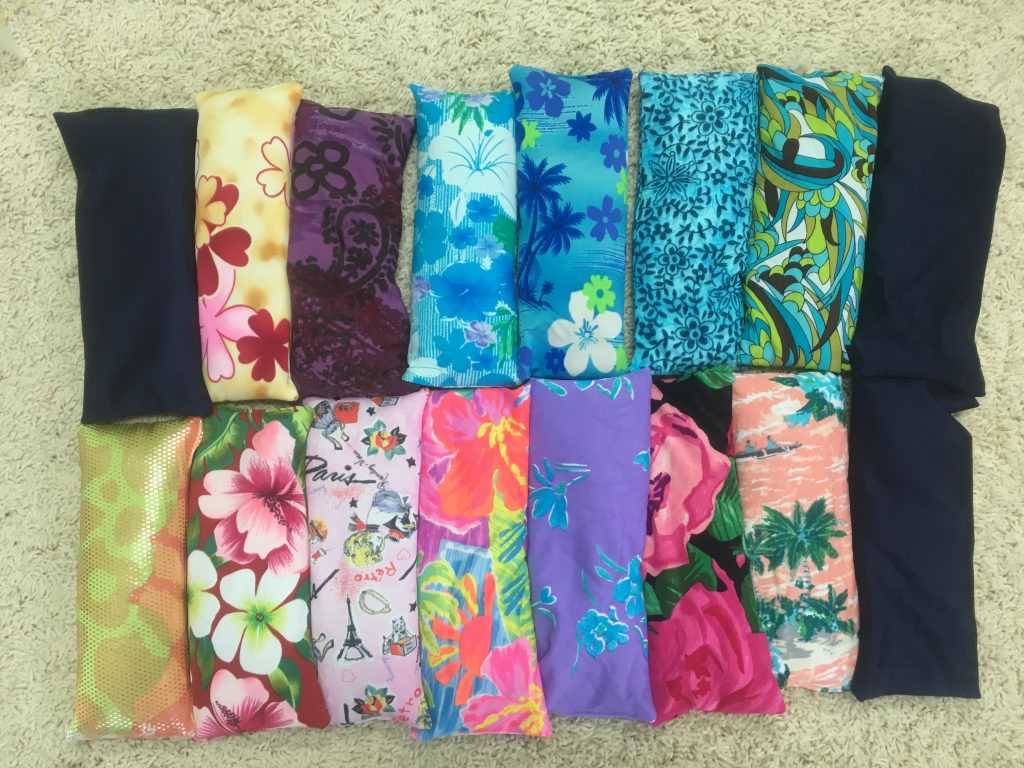
Several years ago when I moved to MN, one of my fabulous friends gave me an eye pillow. I loved it and used it all the time, but the fabric did not match my bedroom. I decided I would make a new cover for it and continued to love it. Then I was talking with my neighbor and she wanted one. I decided to start making them. I ordered the flaxseed in bulk from eBay, added a few drops of lavender oil. I repurposed lots of my lycra scraps for wonderful custom eye pillows. My neighbor loved hers, along with everyone else I gifted one too. Beware, my mother said hers got tangled up in her sheets and did not make it thru the washer, not good for the flaxseed!

  • 8 oz flaxseed per pillow
  • 2-3 drops lavender oil
  • fabric scraps – 9″ x 4″ – 2(front and back needed) sewn with 1/2″ seam

Sew the fabric around all sides, leaving a small opening for filling with flaxseed. I weighed my flaxseed since I was making many and did not want to run out. I added a few drops of lavender oil, stirred, then used a funnel to gently pour the flaxseed. Move flaxseed to the bottom of the pillow away from the opening, then sew up the opening. Super easy and fun project, and I love my eye pillow to keep the light out in the morning. You can also use it to add a bit of pressure to alleviate headaches. Let me know how yours turn out!

LiveCreative: Macrame’ Chair

Do you have an outdoor chair with a great frame, but the seating area is gone? I did and wanted to make it fabulous again. With some time and patience, I made the chair even better than it was new!

I removed the rattan from this frame and had a great shell. I did a search on Macramé chair and found some great directions, see link Macramé Chair

You will need:

2 big plastic 19mm crochet hooks, I got these at Michaels

approximately 2 skeins of the 6mm craft cord, I used the Bonnie craft cord in the Jute color.

I had these really great chairs that had given up the rattan.  I removed it and had a great form for the Macrame’.

Tie a square knot in one corner, then start weaving.  The video does a great job of walking thru the weaving.

The first layer of weaving is one direction, then  once done you start weaving between the two strands of each first pass.  Use the crochet hooks to hold the loops of the strand you are working on.

The hardest part is getting everything tight enough.  After a few rows use the hooks or something else to push all the rows tight.  Do this tightening throughout the weaving process.

Once the seat is done, move to the back. The ends will be looped thru in a knot, and then burned with a flame to ensure the rope does not ravel.  Then the seared end can be tucked into the weaving.


I wove two chairs and am thrilled with how they turned out!

LiveCreative: Silver Leather Jacket

I wanted a silver leather jacket, but did not want to spend much money. Sometimes Goodwill has nice stuff for reasonable prices. It took a bit of time shopping at a few different locations, before I found one I liked the style and fit, and got it for $5! If you are not in a hurry you can find really wonderful things!
The leather jacket I chose was black with a silver lining.

I cleaned the leather with alcohol one day and dyed it the next to ensure it was dry.

I used a pewter and silver dye mixed together to get the color I wanted.

It took a bit of trial and error and since I started with a black jacket, it took 2 coats, but I am super happy with how the jacket turned out. I wear it a lot and get many compliments.

Remember to take some extra time around the seams and stitching, to ensure the dye gets in all the crevices. The underside of the zipper leather will show when you are zipping and unzipping, so remember this detail. You can also dye the fabric of the zipper, if needed. Especially important if you are changing colors of a jacket. Underneath the collar is very important. The leather in the pockets can show, and the leather inside the sleeves and inside the jacket. Between the layers of leather on the edge of the collar will take some extra care but it will be worth the time.

I love my results.  I have worm the jacket several times and love it.  The leather is still soft and pliable.  It is a great jacket.

LiveCreative: Sandals New and Improved

I was shopping at my favorite store a few weeks ago, and found a pair of Style and Co sandals for $1! Yes a new pair of sandals for $1!

The gold color on the straps  was flaking and peeling in a few places, but for $1 I can get out some paint, and do a mix and match to achieve the right color to update the straps.

I found a few gold, taupe, cream paints in my stash.  I mixed them together to achieve the same gold as the sandal straps.

I was to lazy to get a brush, so I just applied with my fingers and I am happy with the result.  I did not touch up the gold paint on the tag in the sole of the sandal.

I am quite happy with how they turned out.  I have worn them several times since my refurbish.  Always look at a bargain to see if it is worth the time, and if so you have a  new item for a great price, a fun project and a story.  It is up to you if you tell the story, or just say thank you when you receive a compliement!

LiveCreative!